Saturday 21 January 2012

Colourworks London : Eye Colour Delight

Hey look, it's my first make up post! No nails or dodgy skin in sight. Don't be scared ^.^


I just wanted to share this little kit I picked up in Superdrug the other day. It's from their Christmas gift selection and I have no idea how much it cost originally, but it was on sale so I paid the princely sum of £1.99. Normally I tend to avoid these types of gift set because gift set make up can be a bit hit and miss, but at less than £2 I figured I couldn't really lose. And I'm really quite glad I took the risk!

(without flash)
You get 5 glitter eyeliners for your £1.99, making an average of 40p per liner, in black, gold, copper, purple and a turquoisey sort of blue. The black one has a black base and the other four are coloured glitters in a clear base. Application seems pretty decent - at least it did on my hand. The black one was easiest since it's pigmented, the others are a bit more sparse and you might have to go back and add a bit more in some places (swatch shows one application only). 

(with flash)
I was pretty impressed with their staying power. I kept them on my hand for about 20 minutes while I took photographs and then I removed them with a face wipe. I had to wipe quite firmly to remove them which gives me hope that they'll last quite well on my eyes too. There was certainly no fallout of glitter anywhere - it stayed firmly in the base.

I haven't had chance to try this on my eyes; since it's from a post-xmas sale they won't be around for long. I thought I'd just put these swatches up as quickly as possible for now, in case anyone wants to dash off and grab one while they still can!

Thursday 19 January 2012

Avon Nailwear Pro : Violetta Sparkle

Now that the trauma of TMI Thursday has passed, I thought I'd soothe my frayed nerves with glitter.

Enter Violetta Sparkle, from Avon.


Were my nerves soothed by this lovely glittery purple? 
Not in the least. I've spent all day trying to get a good picture of this polish. I've used two different cameras, four different rooms and about a million light sources. Unfortunately the camera that came closest to capturing this colour accurately was my camera phone, so you're going to have to ignore the kinda blurry pictures I'm afraid. But at least the colour's right!

(with flash)

Violetta Sparkle is a Cadbury purple jelly with lots and lots of gold glitter. It goes on quite nicely, no particular problems with application (though the brush is pretty bog standard and I don't especially like the square lid, which makes it less than comfortable to hold, but that's minor really). Like many other jellies it does need three coats to be opaque; I tried to get away with two because the purple was more obvious that way, but it dried patchy and I had to add a third, whereupon the purple became less of a Cadbury/royal purple and turned into a darker, more vampy shade. 


On the nail, it reminds me of a darker version of Orly Oui, or OPI It's My Year. Though in every single one of my shots, it looks darker on the nail than it does in real life. It's so frustrating trying to capture this sort of shade perfectly!


Drying time was okay, not especially fast, but not painfully slow either. It doesn't claim to be quick drying, so that's okay. Wear was a little disappointing, though. It didn't chip after two days, but there was tipwear by the end of the first day. Maybe if I'd wrapped my tips it would have helped, but it still appeared too fast for my liking.


See how it looks in the bottle here? That's how it looks on the nail in real life. The glitter is absolutely gorgeous - just enough to catch the light and twinkle beautifully, but not over the top. In some lights I even caught a green flash amongst the gold, but couldn't see any actual green glitter, so it must be something to do with the way this particular gold reflects at certain angles.


Finally I got an accurate shot of how it looks on the nail! This was picture no. 9364583853652. Or at least, that's what it felt like >.<

Overall, this polish is absolutely stunning. The colour is lovely, the glitter is beautiful. It's definitely one of those polishes that looks better on the nail than you thought it would when it was still in the bottle - I thought it was pretty to start with, but when I painted my nails with it, I kicked myself for not having tried it sooner. The only minus is the tipwear, and I suppose the need to use three coats is less than ideal (but then it's a jelly so I can hardly complain). Considering that Avon often play it safe with rather boring colours, I think they've outdone themselves this time. Let's hope they keep going like this (but also make it a bit longer lasting)!

EDIT: So... I was going to change this mani but first, I filed my nails. I often file them down while wearing a dark polish because it helps you see the shape better and helps protect the nail from being damaged by the file. And after I'd filed them, the polish still looked great (I filed off the tipwear). And since then, no more tipwear has appeared, and it's now 3 days later!! I don't know what the problem was first time round, because now it seems like a really long lasting polish. Go figure!

TMI Thursday : Part 1

This post contains TMI: Too Much Information. (It's also very long; sorry about that).


I'm not kidding; those of you who're only here for the nails, and anyone with a squeamish constitution? Look away now, while you still can... because this is the first in a new series here at Glitter Mountain: TMI Thursday. These are the posts where I'll be documenting my journey towards clear skin. I have adult acne; it's embarrassing, often painful, and usually rather unattractive to look at, but since 50% of women and 25% of men suffer from acne at some point in their adult lives, I'm not alone: that's an awful lot of other people out there who, just like me, have been staring in the mirror and wondering why the heck puberty seems to have come around a second time and what on earth they're supposed to do about it now. When we were teenagers, we could at least rest easy in the knowledge that the chaos on our faces would go away eventually. Not so now, when there's no obvious end in sight; it seems we're stuck with it and that's a very disheartening feeling. It's because of those people that I've decided to do this series; I'll be reviewing the products I use to help me, and documenting my progress with photographs, and hopefully it will be useful to fellow sufferers as well as to me.

There are various types of acne lesion which vary in severity; I'll save the descriptions for another day and for now, just say that my particular selection box of fun includes pretty much all of them at one time or another. There's lots of reasons why someone might get adult acne, and although I've always been a bit prone to this sort of thing, the reason it's got so bad in recent times is because of this:


The contraceptive injection. 
It stops you having babies. It also stops your periods (for most people). And more importantly for me, it stops me from having 14 week mega-periods that leave me crippled with pain, anaemia and exhaustion. It's a sad fact that my hormones are not very well behaved and need to be forcibly controlled by the GP. I've tried a whole ton of other treatments and this is the only thing that works; it's either this or let them microwave the inside of my womb until it stops working completely. I figure a few spots are a fair price to pay in this particular exchange.

Except, well, it's more than a few spots. I'm going to show you a few pictures; they're hidden behind links so that you only have to see them if you really want to. Be gentle with me, I'm really having to be rather brave here... NOBODY sees my skin without at least a layer of concealer, you know?

This is kind of an 'after' shot. I had a whole lot of really bad spots about two weeks earlier than this because when my shot is due to run out, my skin has a party. (Even I'm not brave enough to show you that particular monstrosity). Normally I have the shot two weeks early to try and stop this, but clever me thought perhaps it'd be alright to leave it the full 12 weeks over Xmas. Wrong. Anyway, this shot shows where the spots used to be before a new shot of hormones and something sharp and pointy (more on that later) showed them who's boss. 

The previous shot doesn't really show the extent of my blackheads, so I took this picture under downwards lighting and with lots of make up to make them more obvious to the camera. As you can see, there's a lot of them. Plus, you know how they always say you can steam these things and then squeeze them out? Doesn't work for me. The GP reckons it's because I have Psoriasis: my skin renews itself 7 times faster than normal and this means it's 7 times as blocked. I suspect even a sandblaster would struggle here.

As well as my forehead, I also get acne on my jawline. It's worse on my right hand side for some reason. There's lots of blackheads here too, but my camera was too busy focusing on the zits to see them. Just imagine my forehead, only lower down.

Not many actual zits here, but plenty of blackheads. Nice.

Okay I'm done with the scary stuff. You can come out from behind the sofa now. Here's something cute to make up for the trauma.


As you can probably guess, I don't much enjoy having this condition. I'm aware that there's a lot of people out there who are WAY worse off than I am, and my sympathies go out to every one of them. You probably won't be that surprised, either, that I've decided to stop just covering things up with make up and hoping they'll go away.

But guess what? There's a whole lot of products out there for skin problems like mine. A lot like anti ageing skincare, it's easy to stand there bedazzled by all the clinical looking packaging and wild claims and not have a clue where to start. Here's what I chose.


I'll be reviewing each of these separately, alongside my weekly progress updates, but for now, meet my twin weapons in this new fight: Benzoyl Peroxide (the blue tube on the bottom right) and Salicylic Acid (everything else). Also meet The Torture Kit From the Dark Ages:


Watch this space for a review of this scary looking piece of kit, too.

Well I think that's probably enough for now; I'll report back in a week's time to let you know how things are going. If you've made it this far, thank you for reading. I'll put up something pretty for my next post, I promise!


Saturday 14 January 2012

17 Fast Finish : Sulk

Today's mani is from Boots 17 : 'Sulk', from its autumn/fall collection 'A Woman Scorned'. 


(Please excuse my cuticles; I'm using the world supply of hand cream and cuticle butter right now but apparently they don't care. Stupid winter >.<)

Sulk is a gorgeous jewel tone green; in the bottle it looks closer to turquoise but once on the nail it dries most definitely green. And shimmery. It's not quite so sparkly in real life as it appears in these pictures, but it's most definitely there.

Application is average. There's nothing special about the brush (it's not bad, it does the job well enough, but I did notice the neck of the bottle is small enough that the brush tends to catch on it and get all splayed out. Not really a big deal but you do have to be careful if you don't want polish everywhere). The consistency is a little thick, not unpleasantly so, but it's gloopy enough that it does make it hard to do thin coats (I like thin coats. Not everybody does, though, so if you're a medium to thick coater, this one will be perfect for you!). Sulk is nicely pigmented; two coats is more than enough and it wears well too, BUT it's very far from the 'fast finish' the bottle promises you. This mani is one coat of nail envy, two of sulk, and after 15 minutes it was still really tacky. Like, 'has it even started to dry yet' tacky. So I added a coat of Orly Sec'N'Dry and that fixed things.

Or so I thought.


Check out the sheet mark on my index finger!! And I didn't go to bed for FOUR HOURS after I painted my nails! The bottle shots were taken straight after painting, and these other two were taken after I woke up the next morning. All I can think is that this nail must have had an extra thick coat of Sulk, and even the Sec'N'Dry couldn't save it from doom. (Though I will say that the mark is less obvious in real life than it seems here).


This polish gets 5 out of 10 overall. It's a gorgeous colour; there aren't too many jewel toned greens out there (at least in drugstore brands) that are properly green; most of them lean a lot more towards teal/turquoise/blue tones than this one does. It's also cheap and cheerful at £2.99. But I didn't enjoy the application much and it took way too long to dry for a so called fast dry polish. If you don't rush it and keep your coats thin, plus use a fast dry topcoat, it'll be fine - just don't reach for this one when you only have 5 minutes to paint your nails!

Wednesday 11 January 2012

Rimmel Lycra Pro : Night Flight

Can you believe we're already 11 days into the new year? It seems like only yesterday we were celebrating, now I'm back at work and it already feels like I never had a break at all. Boo, Hiss!

(excuse the cuticles - they don't like cold weather, no matter how much I coddle them with cuticle creams and such)

In an effort to cheer myself up after that 'back to work' feeling, I decided it was time for a dark, vampy manicure as it's been a while since the last time and dark nails always seem particularly appropriate when it's dark and wintery outside! Out came my bottle of Rimmel Lycra Pro in Night Flight.


Night Flight is a dark, dark, blackened aubergine creme. In most lights it looks black, but with a purple undertone that is more obvious in real life than in these photographs... it can't quite decide if it wants to be aubergine or indigo; in the bottle it looks more 'blurple' than on the nail, where the blue inky tinge is less obvious and it becomes more of an aubergine. I tried with two different cameras to capture the purple glow that this polish has, and the only shots that came close were these ones here.


A big pro for this polish is that, since it's a Lycra Pro, it has the lovely wide curved brush that Rimmel uses for its Pro range. It also comes with a good, pigmented, reasonably fast drying formula that goes on evenly and is opaque in two coats. The finish is glossy (so much so that in most of these pictures, it looks like there are marks in the polish, but it's actually reflections of other things in the room!).


Wear was really good, although since it's a dark polish the tipwear etc is much more obvious than it would be with something lighter. I used two coats and no topoat, and did a lot of typing as well as some hardcore manual work dismantling a machine at work, and after three days I had some tipwear and only the vaguest hint of a chip on my index finger (one of those that you only really notice in a close up photograph but in real life it's not obvious).

Overall rating for this polish would have to be an 8 out of 10. It goes on beautifully, dries well, lasts a decent amount of time and it's a gorgeous colour. The only con is the slightly increased tipwear compared to other Lycra Pro's (it won't meet the 10 day lasting period claimed by this range) but this is a common problem with dark colours anyway so not that surprising.

Sunday 8 January 2012

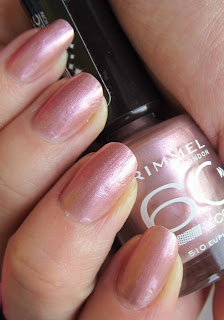
Rimmel 60 Seconds : Euphoria

Another Rimmel for you today - this time one of their fast drying polishes, shade 510 'Euphoria'.

Euphoria is a beige shimmer with a pink flash. It comes with a smaller version of the wide, rounded brush Rimmel use in their Lycra Pro range and which I love so much - application is easy and fast, at least in terms of not messing up your cuticle line. However, as I applied this, I got serious deja vu - it's quite thick, prone to bubbling, and takes waaaay longer than the 60 seconds claimed before it's dry. In fact, every one of the same things I noticed about the last Rimmel 60 seconds polish I reviewed : Green With Envy.


I guess it's just the 60 second formula: it claims to be a one coater, when like Green With Envy, it isn't really. A second coat leaves you waiting ages for it to dry. However, I waited patiently and after two hours I decided it was safe to go to bed. 


Check out the sheet marks! Clearly this polish is one that needs a quick drying top coat (which I didn't use this time; my bad). Anyway, formula issues aside, this is still quite a pretty colour, especially in the sunlight:


Yes, I did say sunlight. Look, girls! The sun came out for the first time this year! I almost fainted. Then I ran around cheering. Then I grabbed my camera :)

I can't lie though. My overall reaction to this polish is 'Meh'. I overlooked Green With Envy's application issues because it was such a stunning colour and that made it worth persevering with, but this one, while pretty, doesn't really look that great against my skin tone so I probably won't wear it again. Someone with less olive skin would probably look great with this polish on, but I struggle a little with light pinky shades, you know? 

Monday 2 January 2012

Collection 2000 Hot Looks : Blue Hawaii

Happy New Year, everyone! Hope you all had a great end to 2011, and that 2012 is filled with promise and exciting new opportunities for all of us! New years bring change and new experiences and I have lots of fun things planned for this blog - watch this space!


Here's my first mani of the year : Collection 2000 Hot Looks, in Blue Hawaii. I received this polish as a Christmas gift and I really like its bright, almost milky sky blue, which makes me think of tropical islands. Yes, I know it's winter here, but recently I've really been craving hot summer colours on my nails. Must be the lack of sunshine from pretty much the whole of 2011 :(

Anyway. Let's get the elephant in the room out of the way first: this mani is not exactly well applied and looks rather blobby. There's a very good reason for this: 


Check out the nightmare brush! There's a split in the side of the 'stalk' and the bristles are escaping out of the side of it. I did the best I could, but you'll have to excuse my nails not being very tidy! I had to kind of blob it on with the side of the brush and it wasn't a whole lot of fun.

Now on to the polish itself. 


Despite the brush, I was actually really impressed with the application and formula of Blue Hawaii, which is actually a shade darker in real life than in these photos. It's creamy, thick (without being gloopy), and smooth, and could actually be a one coater if you're careful - shown here are two coats with topcoat, three on my ring finger because I dinged it just after application and the brush issues made it too traumatic to strip it all off and start again! Blue Hawaii is supposed to be a quick dry polish: I wouldn't call it that since it did take a while to dry - not painfully so, however, but long enough for me to resort to quick dry topcoat to give it a helping hand! As to wear, I'm torn. I chipped a nail on my other hand about 10 minutes after the mani finished drying. However, since fixing it, it's been well behaved ever since (8 hours and counting), so I'm inclined to say that wear is average overall. We'll see how it holds up tomorrow, since I'll be back at work and typing most of the day!


2012 blogging/new camera discovery number 1: Macro Is Brutal. You  know how you think your nails and cuticles look alright, right up until you see them in super-super-zoomed-in-close-up mode? Yeah, that. Please bear with me on this one - apparently, I have work to do :-/